
BGINFO - A Posh Recreation
Recently I have been building a lot of Windows Servers in different environments - one
Grumpy Admin here!
It’s one of the simple things in life in IT operations, as most applications are now “web apps” or require websites for things! I often get asked to quickly deploy an IIS web server, and copy a static html files for it, or install something or other blab la bla… you know the score and there a lot of ways of doing this!
You can template, use VMM, DSC, puppet – manual build process if you paid by the hour…
Today, I decide to manually build an IIS box for this static webpage I had to host, but with a slight twist because I can! I going to use Nano Server, and have a laugh at the other guys when they try to Admin it and do stuff with it! Grumpy Admin can be quite mean, but it something I see over and over, people don’t keep up with the skills and methods of operating these days! Something like this is great just to stay on top and explore your skills, plus I get to use PowerShell so I am happy!
Right, the first thing we need to do, is install Windows server 2016, well to be honest it’s not the first thing, that would be getting coffee! but it’s a start – I have a full Desktop Experience installation of the new RTM build from the Microsoft evaluation centre
I fire up a quick throw away VM, my first for Windows Server 2016 RTM build and install it! Easy – we all done this before I am sure…
Once booted to Server desktop, and logged in, I will launch a CMD window and this is where we begin our fun!
I need to copy the Nano Server files to my local system. So in the CMD window I navigate to your media install disc (the windows server 2016 iso), CD into the Nano Server folder!

Now I need to create the destination folder, using the old skool dos command (as we not in PowerShell yet)
MD c:\nano\
and then do a copy operation on the NanoServerImageGenerator
copy NanoServerImageGenerator C:\nano\

now let’s cd to that drive and the folder and launch our wonderful and loved PowerShell prompt

then we need to import the image generator module that we just copied across!
Import-module NanoServerImageGenerator

Now importing the module is fine and dandy, but what cmdlets does this module provide I hear you asking? How do we find out, well you guessed it…. lets do a get-command on the that newly imported module
get-command -Module NanoServerImageGenerator

consistent with the verb mentality of PowerShell, we have a get,edit and new – exciting stuff, let’s try it out! Clearly we want to use the New cmdlet! Why hold back, let’s do it!
![]()
There some parameter’s here that I have used, as it’s tutorial, while they might be self-evident I better give you a quick break down!
We have the edition, we can either have standard or datacentre – I choose datacentre. Unlike server 2012/2012 r2 in Server 2016 there are feature differences between SKU’s now.
Dam more stuff to remember on the next lots of Microsoft exams which I will have to do because we need to keep our companies partner agreement with Microsoft! Bah! Learning new shit makes grumpy admin Grumpy… well that a lie, I love learning and playing with new stuff! Sadly, building a Nano IIS box, only took me 20 odd mins, writing up is taking longer! grr!
Deployment type – are you the host or a guest, I wonder if you can determine yourself what the difference is here 🙂
media path – this is where the base image is this will be the iso so in our case D:
then the base path, this is where it will store the base wim and packages and other stuff, if this directory doesn’t exist just create it with a MD before you run new-nanoserverimage
target path – really, I have to explain this!!!! Grumpy Admin can’t be bothered, as he is lazy and this is just condescending right??? We are IT pro’s if you deploying nano you can work this shit out right!
and -computername again hello and sorry!
It will ask you for an admin password for the machine – this is a local account, we are not in this tutorial going to domain join this little Nano machine! A perfect tutorial for later one!
Once we hit return to this cmdlet we get some PowerShell progress bars!!!

and here we have it! Done!

That fine, nano comes with a base build than you bolt on packages for the different roles you want it to do. So what packages has it installed just by running this command I hear you asking? I didn’t specify any packages in the command (that’s a bit later) and I know that IIS won’t be in there by default!
To find out we need to use some other cmdlets, and to do this we need to install them. So let’s throw a quick
install-packageprovider NanoserverPackage

and now we have this package provider, we can use the packages that it provides but let us just see what they are right! To do this we use the find-package cmdlet!
find-package cmdlet with the -provider we just installed ie NanoserverPackage

There are a few packages, these should also be in the base folder 😉 I fully expect these will grow in number in the future!
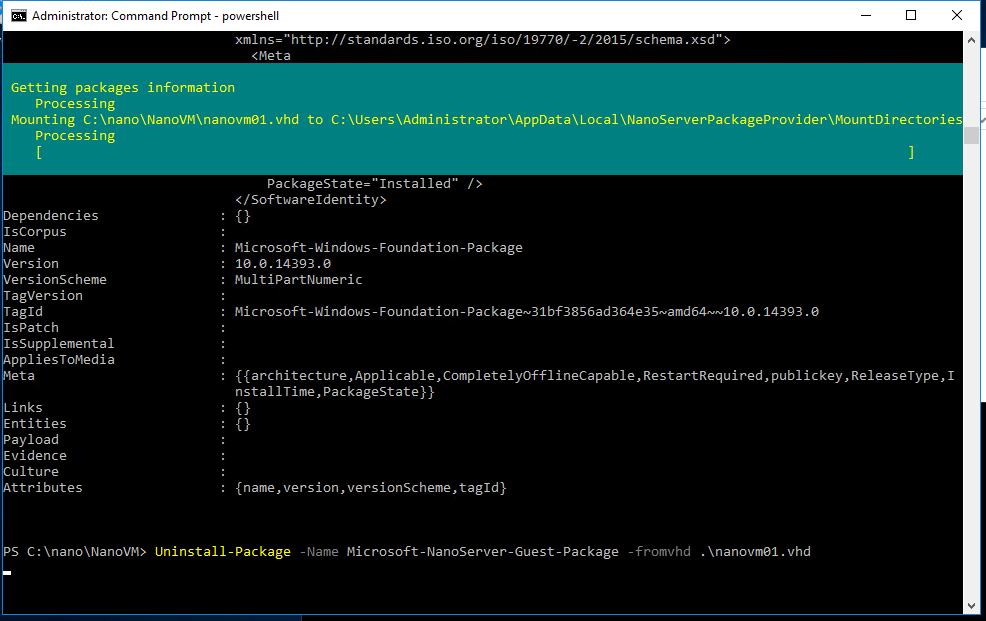
Now as you can see there is a IIS-package listed there! Excellent! Now to get that bad boy installed in to our VHD but first it might be prudent and good demo and away to bloat the blog if we check what packages are installed.
We can use the get-package cmdlet for that and specify the parameter -fromvhd
get-package -provider "nanoserverpackage" -fromvh .\nanovm01.vhd
Now we checked and can clearly see that the IIS package isn’t installed, we can go ahead and install the required package with the very simple and greatly named cmdlet. Again proving the think say do method of using PowerShell works!
install-package -name Microsoft-nanoserver-iis-package -tovhd .\nanovm01.vhd


Now if we repeat the get-package cmdlet we can see that the IIS package is now installed inside our NANO vhd!


So that’s installing a package, while I am here I might as well show you uninstalling packages as well! Grumpy Admin does like to expand on stuff! If you got this far in reading then congratulations most people don’t really read my blog! It more of a personal mind dump these days!

You could reinstall that package you just removed, but I will just delete the whole VM, so that I can show you that when you use the new-nanoserverimage cmdlet you can install packages at the same time!
DEL *.VHD (seriously make sure it’s only your nano VHD you delete!) if you come back and say you deleted your production systems because of this blog… bog off!
the del *.vhd cmdlet is under the big green progress bar btw, Grumpy Admin missed it when he was doing his screenshots and for this I am sorry but remember basically I am too lazy to go back and redo the screenshot!
Then I just run the new-nanoserverimage cmdlet but with the new parameter
-package Microsoft-Nanoserver-IIS-Package.
Now let’s get this machine up and running, I copy it to my Hyper-V box (my own laptop)

I have created my small virtual machine and just specify the VHD file, just to test it I even got it running ok on 128MB or RAM! But the demand was 168MB :’(
Once you attached the VHD, just boot the virtual machine! I have to mega quick on the screenshotting as the server boots FAST!!!! This doesn’t make grumpy admin unhappy, as its doing what it is designed to do boot fast and be stable.
As you will be aware, or bloody well should be aware there is no console access for Nano, but there is the recovery console,

While we are here let’s have a quick look,
As the Nano server has to be managed over the network, it makes sense to have networking, firewall and WINRM options there on the front of Nano console. People who remember the early builds will be pleased, there is the standard information as well once you logged in such as computer name and the local time and date. All quite helpful. But the golden rule is, Nano is a remote headless server!
While I personally I know what IP address it will be assigned, as I control the scope and DHCP , let’s use this networking to get the information
![]()
I only have the one adapter here – so only one option to check

and here some wonderful ipconfig goodness for us!
So if we didn’t know the IP address, we just found it, let’s check to see if IIS is running! This is as easy as going to your browser and typing http://ip/

Proof we have IIS running on Nano! But that not the whole solution now is it, we need to put our own html file on there!

So we are going to enter-pssession to this host, first we need to add it to the local trusted hosts, otherwise PowerShell remoting will just throw red shit at us, and we don’t like that. PowerShell red makes me grumpy!
we have to use the winrm s winrm/config/client trustedhosts command the full code would be
winrm s winrm/config/client '@{trustedhosts="192.168.12.55}'

excellent then we do our enter-pssession command using the IP as the computer name and enter our password as we put -credential!
and bang we are in! Like Tron! Welcome to the GRID or Nano! lol

Now let’s say the source files we want to copy across are on a network share! Here is a share, I put created quickly!

Here is a file inside that share with some HTML , how very conveniently copied from w3c school website!

Here is that file running locally, just to prove what it is and what it look likes, so when we do copy it to our www root folder, you know I am not blagging you!
Now in our PowerShell remote session on the Nano box, lets map this network share, using PSDrive
new-psdrive -name "x" -PSProvider "filesystem" -root "\\192.168.12.54\Website for nano" -credential Administrator

let’s do a quick ls of that and see the files are there – the .txt file was cause, grumpy admin feel for the old notepad thing of adding .txt to the end… grrr that makes me grumpy when that happens!

Now we know the default location for IIS is c:\inetpub\wwwroot\ so we can just do a
cp .\index.html c:\inetpub\wwwroot\
and let hit f5 in our browser and see the fruits of our labour! Shame it isn’t wine! Brilliant, done! simple let all go out for cake!
That all fine, setting something up but we need to know how to Administer the site now we installed it! So Grumpy Admin, how do we administer this IIS installation, well that a good question I hear you asking, so grumpy admin out of the goodness of his heart will answer this for you!
we can use the import-module cmdlet to load all the IISAdministration PowerShell cmdlets
![]()
and as I always do lets, do a quick get-command on this
get-command -module IISAdministration

Now there are a lot of commands to choice from, and administering IIS from PowerShell not the GUI is going to be a culture shock to a lot of Windows Administrators out there! Some commands simple ones are the following!


![]()
There you have it, build a Nano server with IIS, copy files across and then start and stop the web site!
Have a good day! Coffee time!
Hazzy Out!